 Trapping: Raccoons Up In the Trees
By Mark Palas
I stood in front of 40 trapper education students, asking the question: “What can raccoons do that dogs can’t?” The first student who raised his hand responded with, “Wash their food.” True, I told him, but not the answer I wanted to hear. The second gave me that answer: “Climb trees.”
“Yes, yes they can,” I responded enthusiastically, and then I described to the class a way to use that distinction to trap raccoons without worry about nabbing any free-roaming dogs.
Here in Minnesota, we are allowed to set a 220 bodygrip on the ground to trap raccoons in trail sets or baited cubbies. Trappers in northern Minnesota use the same basic set to catch bobcat, fisher, and to a lesser extent, marten.
The only region in the state where the trap is restricted is in the northeast, due to a recent lawsuit involving a protected lynx population.
I believe the 220 bodygrip is the most efficient raccoon trap made. But I have reservations about placing one of these lethal traps on the ground. By and large, I have replaced them with smaller 160 Conibears in my baited cubbies. A trapping friend, Jon Longfellow, owns dozens of 220 Conibears that sit idle in his garage due to concerns about using the trap in populated areas.
About 5 years ago, I started experimenting with setting bodygrips up off the ground in the trees, as a way to avoid free-roaming dogs. I initially quizzed trappers much more experienced than myself, and learned that few had ever tried such sets. The ones who had used leaning poles and crossing logs, exclusively. I’d made the leaning pole and crossing log sets myself, and while they worked, such locations aren’t found everywhere. I wanted a more universal set, one that could be made about anywhere raccoons roam.
While raccoons do climb trees, the pertinent questions here were: How readily will they do so to obtain food? And how best to set bodygrips in trees to catch them?
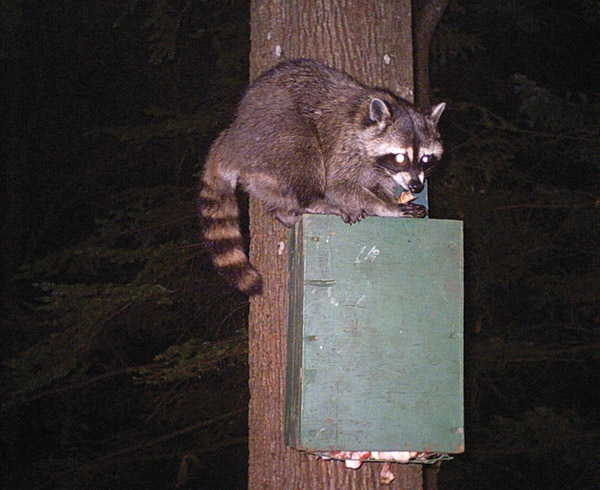
When my dad was still around, he was forever complaining about how difficult it was to keep raccoons away from the suet feeders he’d hang in trees to feed winter birds. Hung high above the ground and bristling with spikes, his bird feeders started to look like medieval weaponry. And the raccoons still emptied them, oftentimes running off with an entire feeder. Raccoons will do just about anything to obtain a meal in the middle of winter, and convincing one to climb a mere 6 feet to work a well-placed set didn’t seem like an insurmountable challenge.
Which still left me with the question of how to best place a baited bodygrip set in a tree. I began by screwing a baited Conibear box, minus the trap, 6 feet off the ground on the side of a vertical tree trunk. I mounted a trail camera in an adjacent tree, to record how animals responded. It was summer when coons are nowhere near as desperate for food as they would be in winter. Even so, the first night, I photographed raccoons working the set and have since obtained more than 100 images of raccoons working the boxes. I also came away with a fair amount of knowledge on how to trap them.
Initially, I placed the box so the entrance was on top. Then I turned the box upside down with the entrance at the bottom. All the while, the trail camera recorded how raccoons responded.
I learned that raccoons favor a box with the entrance on top. They sit on the box, and then crawl into the cubby to feed. Place the same box with the entrance at the bottom, and they still sit on top, only now they try to get through the wire mesh on the back of the box to get at the food inside. I have lots of photos of coons climbing right by the unguarded entrance of an upside down box, only to sit on top trying to fish out the bait through the back. Coons, apparently, like their comfort and feed more readily when comfortably seated.
When the box is placed with the entrance on top, bait naturally falls to the bottom where it belongs, and spring tension alone easily holds the trap in place in the groves cut in the sides of the box. A box with the opening on the bottom requires that the bait be secured so it won’t fall out, and likely also needs some type of bracket to hold the trap in place, too.
A top-entrance box doesn’t have either of these issues, though the bait has to be covered so it can’t be seen by birds soaring overhead. I use a couple of methods, one being simply a handful of marsh grass on top of the bait, after it has been placed in the box. The second is to cut a piece of plywood to the dimensions of the top of the box, with a hole about the size of a coffee can in the middle to serve as an entrance. Such a doorway conceals the bait and gives the coon a platform to sit on before entering the box. I’ve had no problems with raccoons in the 25-pound category climbing down through the 6-inch-round hole.
The plywood must be easily removable after a coon is caught, as the raccoon will be on both sides of it. Otherwise, extracting the coon from the bodygrip would be a bit of a challenge. I attach the doorway with a wire, two screws, and a short roofing nail. Rigged this way, I can remove it and then re-attach it all rather quickly. The nail goes back into its hole, and the wire is quickly wound back around a screw on the side and another on top of the box.
The other issue with top-entrance boxes is alignment. Raccoons tend to balance on the side of the box as they enter. This can result in the trap jaw striking the side of the animal’s neck, rather than the back. Such a strike is less than ideal. I’m considering attaching a platform at the top front of the box, to provide the raccoon a properly aligned perch to sit on before entering.
I make the boxes 24 inches deep with an 8-inch groove to hold the trap springs. While long by some standards, I like that the box holds a lot of bait and also prevents a coon simply reaching in with a paw and springing the trap.
All of my boxes are made with 2-inch dimensional lumber and plywood. I never buy the stuff, as dimensional lumber and plywood of this size can be salvaged from construction site dumpsters. To make a side, I use a 2-by-2 and a 2-by-8, cut to 24-inch length and screwed together with 3-inch deck screws, essentially laminating the pieces together to give me the height I need for a side. The top and bottom of the box are made of 3/8- or 1/2-inch plywood, cut 13 by 24 inches and attached to the sides with shorter screws.
To cut the groove for the trap spring, I drill a 5/8-inch hole centered 8 inches back from the front of the cubby and then make two parallel cuts from the front of the box to this hole with a jigsaw. You should know that not all bodygrips are created equal. The Conibears I own, and purposely buy, have springs that align and thus allow me to cut narrow spring slots. Traps with offset springs require a much wider slot.
The boxes are heavy but durable. Paint them, and they last a long time.
I attach the cubby to the tree using a cordless drill to run two or three fairly modest screws through the plywood and into the tree. Boxes attached in such a way can easily be removed, and it doesn’t damage the tree. You want the top of the cubby 6 feet off the ground.
This set efficiently takes raccoons without jeopardizing free-roaming hounds. Start pre-baiting in early winter to encourage visits, and make your catch when the raccoons are prime and searching far and wide for winter food.
My friend Jon just might have to take those 220 Conibears out of the garage next year, now that he has a safe way to use them.
Good trapping.