 Predator Hunting: Terminal Bullet Performance
By Predator Hunting Editor Judd Cooney
As I examined the third coyote I’d shot with a new bullet for my .220 Swift, I thought, “Back to the loading bench.” At the time, I was working for South Dakota Game & Fish but spent most of my weekends, many early mornings and late evenings shooting prairie dogs or calling coyotes. The ranchers in the area were more than happy to let me cut down on rodent and predator populations, and to make the most of the opportunity, I’d bought a slightly used, varmint barreled, pre-64 Model 70 .220 Swift from a gunsmith friend. I glass bedded the action, free floated the stainless barrel, and started working up some accurate varmint handloads.
The combination of a Sierra 50-grain Blitz and 4350 powder proved most accurate and consistent at the range. Unfortunately, the bullet tore gaping exit holes in most of the red fox and coyotes I shot. At the time, the pelts weren’t worth much, but I hated to see any pelt destroyed.
I figured a full-jacketed 55- or 60-grain bullet might be better, so I loaded up a bunch and went coyote hunting.
The first coyote at 50 yards piled up perfectly following a shoulder hit, with only minimal pelt damage. But the next coyote, shot behind the shoulder at 100 yards, had to be blood trailed a half-mile and shot again. The bullet punched a small hole through the chest with little damage. Not good. The third coyote, hit at 100 yards, literally exploded as the bullet tumbled and angled into a full belly; hydrostatic shock tore a double fist-sized exit hole. Not exactly what I’d hoped to see, either.
Over the years, I have tried hundreds of bullet and load combinations to find the best for each of my hunting rifles. The first criteria is accuracy. If you can’t hit your target at hunting distances, terminal bullet performance is academic. Accuracy is easy to judge at the range.
But the next criteria, bullet performance, is just as important and tougher to appraise. Poor terminal bullet performance can lead to a wounded and lost animal despite an accurate shot. The goal is to find a bullet and load combination that’s tack-driving accurate and produces clean, one-shot kills at all reasonable ranges, and does it without excessive pelt damage.
If you hunt enough, you can evaluate bullets in the field by simply observing the results. But it can be a drawn-out process, to say the least, and you are likely to ruin a lot of pelts along the way, not to mention the occasional lost animal. You can get a lot of useful information, and shorten the process, by first test-shooting bullets into ballistic gel and seeing those results.
A professional ballistic gelatin mix is available from Kind & Knox, but only in bulk, and it is expensive. But enter “ballistic gel recipe” on any internet search engine, and you may find dozens of recipes for less-expensive homemade ballistic gelatin. All are fairly simple to concoct; a usable gel can be home made from Knox clear gelatin mix, available at the local grocery store for about $8 a package. But the stuff has to be kept cool, can be a mess to use under field conditions, and is not very reusable. I tried it a few times.
Then, a few years back, Richard Mann, a gun writer and friend, developed a more user-friendly bullet testing medium that quickly won awards in the gun field. The Bullet Test Tube is a 6-inch-diameter 14-inch-long cardboard tube filled with a wax-like medium that reacts similar to flesh when hit with fired bullets. I say similar, because no single substance exactly duplicates the results of a bullet striking hide, flesh, organs and blood, with all of the variables involved. However, ballistic gel and the Bullet Test Tube can provide a lot of useful performance information with just a few test shots.
The Bullet Test Tube is not cheap, costing approximately $85. But the tubes and the medium can be used over and over again. I’ve been using a couple of the tubes for the past four years, testing bullets from predator and big-game rifles. I’ve also done a lot of muzzleloader bullet testing and even tried a few handgun bullets.
To test bullet performance, simply shoot into the center of the tube at any distance from 10 feet to several hundred yards. But don’t extend the range beyond your ability to make a centered hit. You need to keep the bullet path level and centered in the gel-filled tube to get the best results, regardless of range. The company sells extender tubes for magnum rifles or big game rifles, separate reusable molds and other accessories.
To reuse the material, it must be melted and recast, and for this I bought a Presto electric deep fryer on E-Bay for $12. I recently found a second virtually new Presto cooker at a garage sale for $2. So now I have a backup. Either cooker quickly melts the medium.
This stuff can be messy, as sticky as bubble gum, so put down cardboard before melting and pouring the melted medium, ’cause you are going to make a mess. I’ve been using large cardboard flats but believe a piece of linoleum might work better for scraping up spills and splashes and remelting them.
After the shot, use a carpet or utility knife to cut down both sides of the cardboard container or mold to expose the medium. After removing the halves of the container tube, I use a piece of 30-pound-test monofilament fishing leader material to slice or saw lengthwise through the relatively soft test medium, to expose the bullet’s path. Voila! I have a graphic portrayal of the bullet’s terminal performance. What could be simpler?
After splitting my first test tubes and having to reorder tubes, I got to looking around for a substitute and found that 6-inch-diameter heavy cardboard concrete footer or form tubing is tough, cheap and ideal, as is 6-inch PVC pipe cut to proper length. But if you pour the hot medium directly into these tubes, it will adhere to the sides and you won’t be able to remove it. You need to line the mold with something, and I first tried small garbage bags. This worked moderately well, but I quickly graduated to heavy-duty 10-inch-by-24-inch plastic container bags that are a much better fit. I order the bags in bulk from the U-line company. They work like a charm when carefully fitted into the tubing.
When the melted bullet test medium cools and solidifies in the plastic bag, it shrinks just enough to let the bagged gel tube slide out of the mold easily.
Since my tubes have open bottoms, I set the plastic-lined tube in a tub before pouring in the melted medium, just in case I get a leaky bag, which can happen if you let the melted medium get hot enough to melt the plastic liner.
That little tub, bought for a dollar at a garage sale, has saved me from cleaning up a couple of sticky messes. The tub also allows for saving and reusing the drips that occur as hot medium is poured from the pot into the tube.
The bullet test tube gel melts at about 170 degrees and should never be heated above 185 degrees for safety reasons, nor should it be heated over an open flame. I wear a pair of leather work gloves to protect my hands and to keep the sticky stuff off when handling the tubes. The gloves also make it easier to grip the monofilament cutting line as it is pulled through the test-shot medium.
You can custom cut the tubes to proper length for testing different calibers and bullets, short for lightweight calibers and much longer for magnum and deep-penetrating bullets, such as the all-copper Barnes and Nosler.
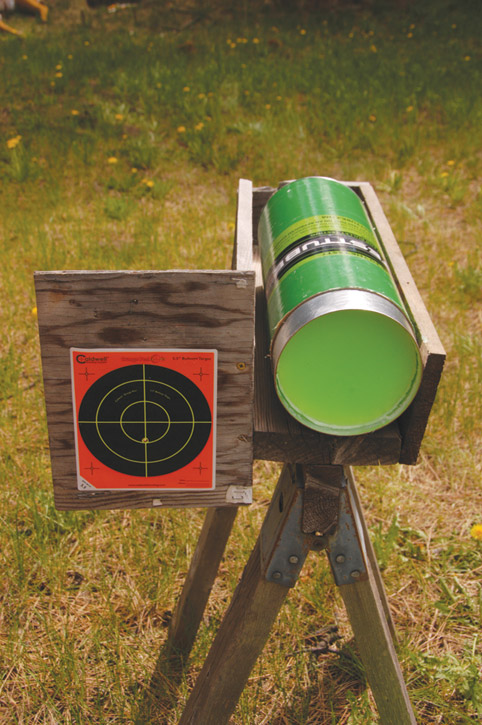
I leave the plastic outer bag on the bullet test tube until after I shoot into it. Much cleaner to handle, store and transport. I built cradles to hold the test tubes at the range, but the violent expansion of the test tube medium as a high-velocity bullet expanded inside literally blew apart several, built from 2-by-6 lumber screwed and glued together.
Then I built an open cradle with two rails centered along the bottom to keep the tube from rolling to either side. With an inch gap on either side of the centered tube, I haven’t had a bit of trouble.
To make sure I can center the bullet in the test tube before shooting (usually at 25 yards) I attach a small plywood backstop to the edge of the cradle, where I stick or staple a target and take a “sighter shot” or two so I know how to hold on the test tube to make sure the bullet is centered when it hits the gel. I also make sure the cradle is level with the shooting bench so the bullet travels parallel through the test tube, which gives best results and also facilitates bullet recovery.
Probably the most irksome task using the bullet test tube is removing the plastic bag from around the medium prior to splitting the bullet test tube. This must be done as the mono doesn’t cut through the plastic worth a darn.
To facilitate this, I slice down one side of the tube with the utility knife and then peel off the bag. Then I saw the mono back and forth through the tube until I get within 6 inches or so of the bottom, reverse the tube, and finish pulling the mono up through the tube until it is cut through.
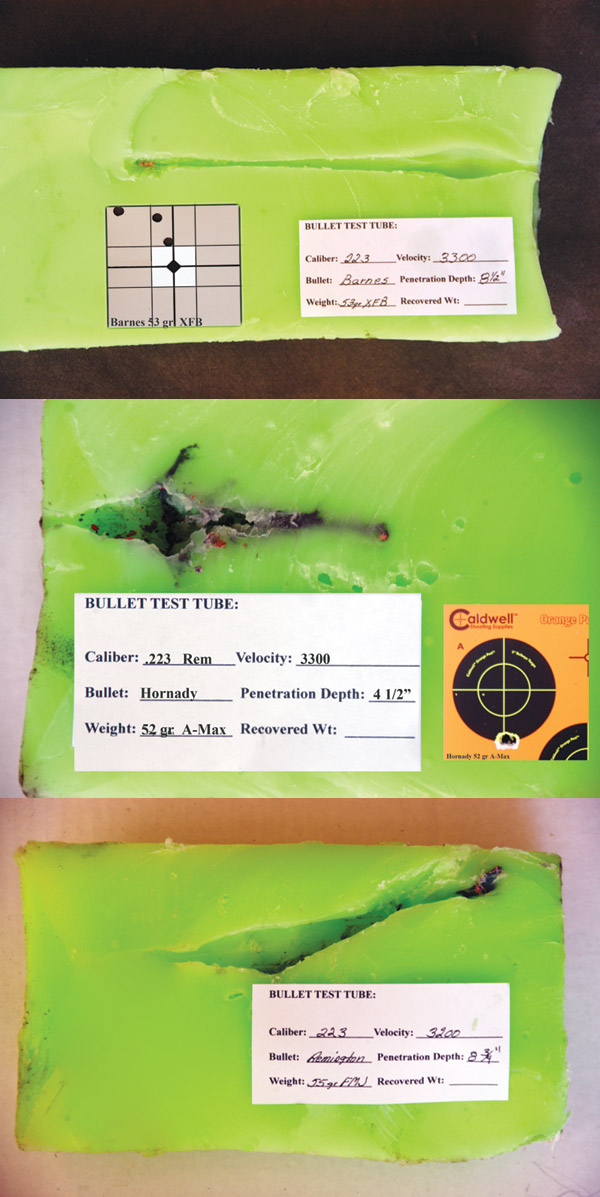
I end up with two halves of gel tube, split lengthwise, with the bullet’s path of travel cleaved right down the middle, and if I’ve used a long enough tube, also a recovered bullet.
To my way of thinking, a recoverable bullet to check and weigh is not a critical factor with high-velocity predator loads, as most are going to break up to almost nothing by the time they run out of energy in the gel. The exception is some of the newer all-copper bullets.
Judging terminal performance of predator loads is somewhat arbitrary. However, comparing a number of different bullets using the Bullet Test Tube will certainly give you a better idea and help eliminate those that obviously don’t cut the mustard, may even teach you a thing or two about bullet performance in general.
I always figured full-metal jacket bullets would bore a clean hole through the medium. Not so. A half-dozen tests showed that the bullets can be erratic and generally don’t penetrate as well as spitzers or hollow points, making them a poor choice. Other bullets were too thin-skinned and literally exploded shortly after impact, which is fine for small varmints such as prairie dogs, ground squirrels and chucks, but causes too much damage for the serious predator hunter wanting to save pelts.
Several bullets punched small holes through the gel with little peripheral damage. Others showed good expansion and penetration but didn’t have the accuracy to make the preferred bullet list.
In my estimation, a pelt-saving, clean-killing predator bullet should expand quickly and expend most of its energy within the first few inches of penetration yet still hold together well enough to punch a small exit hole to let the air (and blood) out of the critter. The bullet has to perform well at point-blank range yet still do the job out to 400 yards, maybe farther.
In addition to near-perfect terminal bullet performance, a superb predator load has to place five shots in 1/2-inch or smaller groups at 100 yards. The bullet must also hold its velocity and accuracy at longer range. Tough criteria, yet a number of polymer-tipped, hollow-point, boat-tail bullets fulfill this wish list.
But don’t take my word for it; get a Bullet Test Tube and check out terminal performance for yourself. You’ll learn something and enjoy spending more time shooting favorite predator rifles.